Proj-2013-2014-Python-STM32F4
Introduction
Team
- Tutors : Olivier Richard
- Members : TAO Xinxiu , XIA Ye
Objectives
Software Requirements Specification (SRS)
The SRS document:
Points à traiter
- Modidification des Makefile
 utilisation de arm-none-eabi-g++ et des bonnes options
 https://launchpad.net/gcc-arm-embedded
- support STL
  Voir https://github.com/andysworkshop/stm32plus
  à voir aussi
  uSTL http://msharov.github.io/ustl/
- Lib C
Voir newlib et newlib-nano
From
newlib-nano 2.0 : Included in source package
https://launchpad.net/gcc-arm-embedded
Release notes for
*************************************************
GNU Tools for ARM Embedded Processors 4.8 - Q4 2013
* newlib-nano 2.0 : Included in source package
- gc Garbage Collection
Voir tinygc http://tinygc.sourceforge.net/
- libprce
Voir T-Rex is a minimalistic regular expression http://tiny-rex.sourceforge.net/ http://sourceforge.net/projects/tiny-rex/
Progress
project start : 13/01/2014
Week 1 (13/01 - 19/01)
- Project discovery
- Research of related projects
Week 2 (20/01 - 26/01)
- STM32 develop environment
   Add USB device
       Create a new udev rule in /etc/udev/rules.d/45-usb-stlink-v2.rules:
       SUBSYSTEM=="usb", ATTR{idVendor}=="0483", ATTR{idProduct}=="3748", MODE="660", GROUP="plugdev"
       To reboot :
       $ sudo service udev restart

   Download the GNU/ARM toolchain
       Download the Linux current installation tarball from
       https://launchpad.net/gcc-arm-embedded/+download
       $ tar -xvjf gcc-arm-none-eabi-xxxxxxxxxxxxxxxxxx-linux.tar.bz2
       Add the fallowing to your ~/.bashrc
       export PATH=$PATH:~/xxxxxxx/gcc-arm-none-eabi-xxxxxxxxx/bin
       $ source ~/.bashrc
       To check :
       $ arm-none-eabi-gcc --version
       If you get an error message “bash : ... file does not exist”.
       Maybe it is caused by the difference between 32bit and 64bit system. Try :
       $ sudo apt-get install ia32-libs*

   Download and Build STLINK
       STLINK is for programming and debugging firmware.
       you'll first need to install a couple of packages:
       $ sudo apt-get install autoconf pkg-config libusb-1.0 git
       Retrieve a copy of the STLINK source:
       $ git clone https://github.com/texane/stlink.git
       Build the code following the instructions in the README, with:
       $ ./autogen.sh
       $ ./configure
       $ make
       As a sanity check, look in ~/st-link and you should see st-util, st-flash, etc...
       You may check if the board could be connected by execute st-util.
       If it does not work please confirm if the rule you added in the first step corresponds your system.

   Refer to link : http://www.wolinlabs.com/blog/linux.stm32.discovery.gcc.html
- Try the official examples of ST on the cards
   To avoid using the commercial software IDE and understand better, We decided to develop on Linux for this project.
   During the tries, for certain examples, we've got different results on STM32F407 and STM32F401.
   We choose STM32F407 as the hardware for the following developement.
Week 3 (27/01 - 02/02)
- Test Project MicroPython
- Test Project Shedskin
- STM32 hardware


Week 4 (02/02 - 09/02)
- STM32 breakdown situation & solution
 Cause Reason
   After
   RCC->AHB1ENR |= RCC_AHB1ENR_GPIOCEN;
   GPIOC->MODER = 0x04000000;
   GPIOC->ODR ^= (1 << 13);
   is used (compiled and burned successfully)

 Status
   1) $st-flash write timer_gpio_out.bin 0x8000000
   2012-02-09T23:25:54 INFO src/stlink-common.c: Loading device parameters....
   2012-02-09T23:25:54 WARN src/stlink-common.c: unknown chip id! 0
   stlink_sram_flash() == -1
   make: *** [write] Error 255

   2) hold the Reset button while:
   $./st-util
   2012-02-25T16:00:42 INFO src/stlink-common.c: Loading device parameters....
   2012-02-25T16:00:42 WARN src/stlink-common.c: unknown chip id! 0xe0042000
   2012-02-25T16:00:42 INFO src/stlink-sg.c: Successfully opened a stlink v1 debugger
   Chip ID is 00000000, Core ID is 00000000.
   KARL - should read back as 0x03, not 60 02 00 00
   init watchpoints
   Listening at *:4242...

   3) $st-flash erase
   2012-02-09T23:28:01 INFO src/stlink-common.c: Loading device parameters....
   2012-02-09T23:28:01 WARN src/stlink-common.c: unknown chip id! 0xe0042000
   Mass erasing

   4) If I hold the Reset button while erasing:
   ahl@ubuntu:~/Desktop/3/stlink/example/32l_lcd$ ../../flash/flash erase
   2012-02-09T23:28:28 INFO src/stlink-common.c: Loading device parameters....
   2012-02-09T23:28:28 INFO src/stlink-common.c: Device connected is: L1 Med-density device, id 0x10386416
   2012-02-09T23:28:28 INFO src/stlink-common.c: SRAM size: 0x4000 bytes (16 KiB), Flash: 0 bytes (0 KiB) in pages of 256 bytes
   Mass erasing

   5) If I hold the Reset button while flashing:
   dahl@ubuntu:~/Desktop/3/stlink/example/32l_lcd$ make write
   ../../flash/flash write lcd.bin 0x08000000
   2012-02-10T14:13:21 INFO src/stlink-common.c: Loading device parameters....
   2012-02-10T14:13:21 INFO src/stlink-common.c: Device connected is: L1 Med-density device, id 0x10386416
   2012-02-10T14:13:21 INFO src/stlink-common.c: SRAM size: 0x4000 bytes (16 KiB), Flash: 0x20000 bytes (128 KiB) in pages of 256 bytes
   2012-02-10T14:13:21 INFO src/stlink-common.c: Attempting to write 7332 (0x1ca4) bytes to stm32 address: 134217728 (0x8000000)
   2012-02-10T14:13:21 WARN src/stlink-common.c: pecr.pelock not clear (0x7)
   2012-02-10T14:13:21 WARN src/stlink-common.c: Failed to erase_flash_page(0x8000000) == -1
   stlink_fwrite_flash() == -1
   make: *** [write] Error 255

 Solution
   1) hold the Reset button while:
   $ st-util
   2013-03-23T15:51:17 INFO src/stlink-common.c: Loading device parameters....
   2013-03-23T15:51:17 INFO src/stlink-common.c: Device connected is: F1 Medium-density device, id 0x20036410
   2013-03-23T15:51:17 INFO src/stlink-common.c: SRAM size: 0x5000 bytes (20 KiB), Flash: 0x20000 bytes (128 KiB) in pages of 1024 bytes
   Chip ID is 00000410, Core ID is 1ba01477.
   KARL - should read back as 0x03, not 60 02 00 00
   init watchpoints
   Listening at *:4242...

   2) Next you will need to launch gdb (in a new terminal) from the tools directory
   and make use of the compiled binary that you pulled created earlier during the "make all".
   $ tools/arm-2011.03/bin/arm-none-eabi-gdb -q build/fw_coptercontrol/fw_coptercontrol.elf
   Reading symbols from
   /home/xxx/OpenPilot/build/fw_coptercontrol/fw_coptercontrol.elf...done.
   (gdb) target remote localhost:4242
   Remote debugging using localhost:4242
   0x0800010c in ?? ()
   (gdb) bt
   #0 0x0800010c in ?? ()
   #1 0xffffffff in ?? ()
   Backtrace stopped: frame did not save the PC
   (gdb) i r
   r0 0x0 0
   r1 0xa5a5a5a5 2779096485
   r2 0x0 0
   r3 0x200002d4 536871636
   r4 0x20000cd0 536874192
   r5 0xa5a5a5a5 2779096485
   r6 0xa5a5a5a5 2779096485
   r7 0xa5a5a5a5 2779096485
   r8 0xa5a5a5a5 2779096485
   r9 0xa5a5a5a5 2779096485
   r10 0xa5a5a5a5 2779096485
   r11 0xa5a5a5a5 2779096485
   r12 0xa5a5a5a5 2779096485
   sp 0x20000938 0x20000938
   lr 0xffffffff 4294967295
   pc 0x800010c 0x800010c
   fps 0xaddeadde 2917051870
   cpsr 0x1000000 16777216
   (gdb) c
   Continuing.

   Hit CTRL+C to test breakpoints and use l to see line numbers

   (gdb) c
   Continuing.
   ^C
   Program received signal SIGTRAP, Trace/breakpoint trap.
   0x080039a0 in nmeaProcessGPRMC (GpsData=0xa5a5a5a5, gpsDataUpdated=<value optimized out>, param=0x20000cd0,
   nbParam=<value optimized out>) at ../Modules/GPS/NMEA.c:559
   559 GpsData->Heading = NMEA_real_to_float(param[8]);
   (gdb) l

 I quitted the gdb when i found that the board worked again. Again you can easily verify the firmware.

 There are some situations solved by erasing or flashing while holding the reset button(black), but it does not work in our issue.

 Refer to link :
   http://forums.openpilot.org/topic/20173-regrouping-on-various-stm32f4discovery-swd-debugging-for-oplink-revo-cc3d/
- Test of STM32 printf
 Refer to link : http://vedder.se/2012/07/usb-serial-on-stm32f4/

 We have tried the program for the STM32F4 Discovery that uses the USB-CDC class to show up as an virtual serial port.
 It has routed the write system call to use this port, so the stdio printf function will print directly to this serial port.
 After have uploaded the program to the STM32F4 discovery and plug in a micro-USB cable to the port next to the audio jack.
 The serial port should show up as /dev/ttyACM0 on most GNU/Linux distributions, such as Ubuntu.
 Start a serial port terminal, such as gtkterm (sudo apt-get install gtkterm on Debian/Ubuntu), and open ttyACM0.
 As the following shot-screen :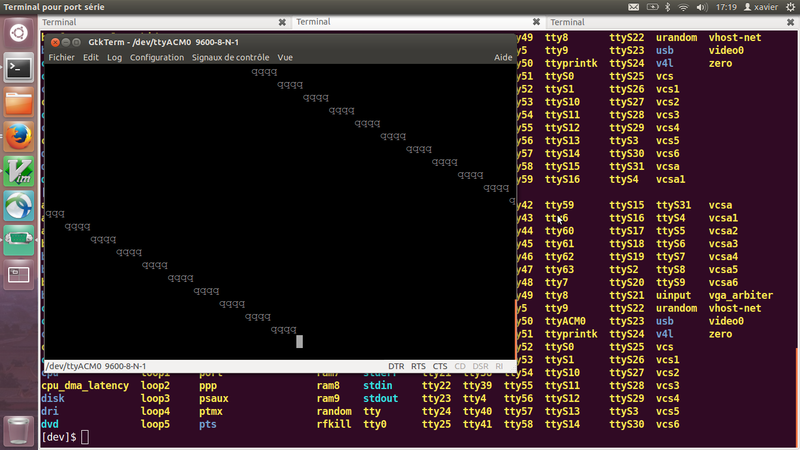

Week 5 (10/02 - 17/02)
- SRS document Proj-2013-2014-Python-STM32F4:SRS
- build and learn Project STM32Plus