Difference between revisions of "STM32 Nucleo"
| (15 intermediate revisions by the same user not shown) | |||
| Line 64: | Line 64: | ||
uint16_t meas = analog_value.read_u16(); // Converts and read the analog input value |
uint16_t meas = analog_value.read_u16(); // Converts and read the analog input value |
||
printf("Value %d \n", meas); |
printf("Value %d \n", meas); |
||
| + | fprintf(stderr,"Value %d \n", meas); |
||
if (meas > MV(1000)) { // If the value is greater than 1000 mV toggle the LED |
if (meas > MV(1000)) { // If the value is greater than 1000 mV toggle the LED |
||
| Line 73: | Line 74: | ||
</source> |
</source> |
||
| − | 3) Ouvrez le port série de la carte pour l'affichage de la console de la carte : |
+ | 3) Ouvrez le port série de la carte pour l'affichage de la console de la carte : fonctions ''printf()'' et ''fprintf()'' |
<pre> |
<pre> |
||
| Line 87: | Line 88: | ||
sudo apt-get install moserial |
sudo apt-get install moserial |
||
</pre> |
</pre> |
||
| + | |||
| + | Ou bien Zterm (MacOS), PuTTY (Windows), TeraTerm (Windows) |
||
| + | |||
| + | Le baudrate est 9600 bauds |
||
=Installation et Utilisation de l'interpréteur Javascript [[Espruino]]= |
=Installation et Utilisation de l'interpréteur Javascript [[Espruino]]= |
||
| Line 94: | Line 99: | ||
| + | Voir la page de la team ST |
||
| + | * http://developer.mbed.org/teams/ST/ |
||
| + | * http://developer.mbed.org/teams/ST-Americas-mbed-Team/wiki/STM32-Nucleo-ATT-Hackathon |
||
| + | |||
| + | |||
| + | ==[[OpenOCD]]== |
||
| + | Flashage via [[OpenOCD]] |
||
| + | |||
| + | ==Utilisation de [[Libopencm3]]== |
||
| + | https://balau82.wordpress.com/2015/04/19/libopencm3-on-stm32-nucleo-board/ |
||
==Communication hôte== |
==Communication hôte== |
||
* http://wiki.labaixbidouille.com/index.php?title=Communiquer_entre_un_PC_et_la_carte_STM32_Nucleo |
* http://wiki.labaixbidouille.com/index.php?title=Communiquer_entre_un_PC_et_la_carte_STM32_Nucleo |
||
| − | |||
==Robotique== |
==Robotique== |
||
===H-Bridge=== |
===H-Bridge=== |
||
[[Image:MonsterMotoShield+STNucleoF401.jpg|200px|right|thumb|Monster Moto Shield with ST Nucleo F401]] |
[[Image:MonsterMotoShield+STNucleoF401.jpg|200px|right|thumb|Monster Moto Shield with ST Nucleo F401]] |
||
| + | [[Image:VL6180X-001.jpg|200px|thumb|right|VL6180X Eval Kit]] |
||
| + | |||
| + | |||
* [[Mbed]] program for [[Monster Moto Shield]] : http://mbed.org/users/donsez/code/NucleoF401_MonsterMotoShield/ |
* [[Mbed]] program for [[Monster Moto Shield]] : http://mbed.org/users/donsez/code/NucleoF401_MonsterMotoShield/ |
||
* http://developer.mbed.org/components/SparkFun-Ardumoto-Shield/ |
* http://developer.mbed.org/components/SparkFun-Ardumoto-Shield/ |
||
| Line 111: | Line 128: | ||
===Servo Moteurs=== |
===Servo Moteurs=== |
||
TODO |
TODO |
||
| + | |||
| + | ===DC motor drivers=== |
||
| + | * [[X-NUCLEO-IHM07M1]] Three-phase brushless DC motor driver expansion board based on L6230 for STM32 Nucleo |
||
==MicroSD== |
==MicroSD== |
||
| Line 128: | Line 148: | ||
==Proximity== |
==Proximity== |
||
* Shield [[VL6180X]] Explorer |
* Shield [[VL6180X]] Explorer |
||
| + | * [[LS53L0X]] Shield (3 to 200 cms) with ST [[VL53L0X]] Laser Distance Sensor. |
||
==MEMS== |
==MEMS== |
||
| Line 134: | Line 155: | ||
==[[NFC]]== |
==[[NFC]]== |
||
* [[Shield NFC X-NUCLEO-NFC01A1]] |
* [[Shield NFC X-NUCLEO-NFC01A1]] |
||
| + | ** http://developer.mbed.org/teams/ST-Americas-mbed-Team/code/Nucleo_BLE_HeartRate/wiki/Homepage |
||
| + | |||
| + | ==[[LoRa]]== |
||
| + | * Module d'évaluation SX1276 [[SX1276MB1MAS]] |
||
| + | * https://www.st.com/en/evaluation-tools/b-l072z-lrwan1.html |
||
| + | * https://www.st.com/en/evaluation-tools/i-nucleo-lrwan1.html |
||
| + | * https://www.st.com/en/evaluation-tools/p-nucleo-lrwan1.html |
||
| + | |||
| + | ==[[Sigfox]]== |
||
| + | * https://www.st.com/en/evaluation-tools/b-l072z-lrwan1.html |
||
| + | |||
| + | ==[[HC-SR04 Ultrasonic Sensor Distance Measuring Module]]== |
||
| + | * https://developer.mbed.org/users/donsez/code/Nucleo_Ultrasonic-HCSR4/ |
||
| + | |||
| + | <source lang="c"> |
||
| + | /* EXAMPLE */ |
||
| + | #include "mbed.h" |
||
| + | #include "hcsr04.h" |
||
| + | |||
| + | //D12 TRIGGER D11 ECHO |
||
| + | HCSR04 sensor(D12, D11); |
||
| + | int main() { |
||
| + | while(1) { |
||
| + | |||
| + | long distance = sensor.distance(); |
||
| + | printf("distance %d \n",distance); |
||
| + | wait(1.0); // 1 sec |
||
| + | |||
| + | } |
||
| + | } |
||
| + | </source> |
||
| + | |||
| + | ==GNSS (GPS/Galileo/Glonass/BeiDou/QZSS)== |
||
| + | * [https://www.st.com/content/st_com/en/products/ecosystems/stm32-open-development-environment/stm32-nucleo-expansion-boards/stm32-ode-connect-hw/x-nucleo-gnss1a1.html X-NUCLEO-GNSS1A1] based on [https://www.st.com/content/st_com/en/products/positioning/gnss-modules/teseo-liv3f.html Teseo-LIV3F] |
||
Latest revision as of 19:01, 30 October 2018
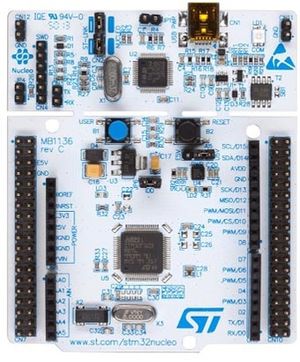
Les cartes Nucleo sont des cartes STM32 découvertes (très peu chères : 9 euros HT chez Farnell) supportant les shields Arduino. La programmation et le debug passe par le port USB (ST-Link/V2-1). Le port USB émule le Serial USB. Le PCB est sécable pour détacher le programmateur ST-Link/V2-1. Elles sont programmables avec l'IDE en mode SaaS Mbed.
Plusieurs cartes d'extension stackablessont développés et en développement par ST Microelectronics : Driver Stepper, communication BLE 4.0, MEMS (gyro, magneto, accelerometre), capteur laser de distance (courte), ...
Premiers Pas (Getting Started)
1) Créez vous un compte sur http://mbed.org
2) Sélectionnez la carte Nucleo que vous possédez (pour ma part, une ST-Nucleo-F072RB).
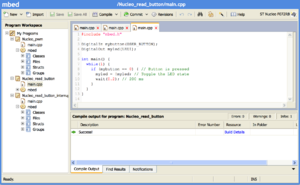
3) Ouvrez l'IDE avec cette carte (Bouton Open mBed Compiler)
4) Créez un nouveau programme menu New > New Program ...
5) Utilisez un des templates (par exemple Nucleo Read Button)
#include "mbed.h"

DigitalIn mybutton(USER_BUTTON);
DigitalOut myled(LED1);

int main() {
  while(1) {
    if (mybutton == 0) { // Button is pressed
      myled = !myled; // Toggle the LED state
      wait(0.2); // 200 ms
    }
  }
}
6) Compilez (menu Compile)
Un fichier .bin est généré et téléchargé
7) Copiez le fichier .bin à la racine du disque amovible Nucleo qui se trouve sur votre poste.
La carte Nucleo flashe le binaire et redémarre.
Appuyez le bouton User de la carte pour voir le résultat.
Utilisation du port série
1) Faites un montage simple avec un potentiomètre en mettant sa patte centrale sur la pin A0 de la carte et les pattes externes sur 3.3V et GND.
2) Recommencez les étapes précédentes avec le programme ci-dessous et copiez le .bin produit sur le disque Nucleo.
#include "mbed.h"

AnalogIn analog_value(A0);

DigitalOut myled(LED1);

// Calculate the corresponding acquisition measure for a given value in mV
#define MV(x) ((0xFFF*x)/3300)

int main() {
    while(1) {
        uint16_t meas = analog_value.read_u16(); // Converts and read the analog input value
        printf("Value %d \n", meas);
        fprintf(stderr,"Value %d \n", meas);

        if (meas > MV(1000)) { // If the value is greater than 1000 mV toggle the LED
          myled = !myled;
        }
        wait(0.2); // 200 ms
    }
}
3) Ouvrez le port série de la carte pour l'affichage de la console de la carte : fonctions printf() et fprintf()
dmesg | grep tty
cat /dev/ttyACM0
4) Faites varier le potentiomètre
5) Vous pouvez utiliser aussi moserial ou screen
sudo apt-get update
sudo apt-get install moserial
Ou bien Zterm (MacOS), PuTTY (Windows), TeraTerm (Windows)
Le baudrate est 9600 bauds
Installation et Utilisation de l'interpréteur Javascript Espruino
(A FAIRE CET ETE)
Pour continuer
Voir la page de la team ST
- http://developer.mbed.org/teams/ST/
- http://developer.mbed.org/teams/ST-Americas-mbed-Team/wiki/STM32-Nucleo-ATT-Hackathon
OpenOCD
Flashage via OpenOCD
Utilisation de Libopencm3
https://balau82.wordpress.com/2015/04/19/libopencm3-on-stm32-nucleo-board/
Communication hôte
Robotique
H-Bridge
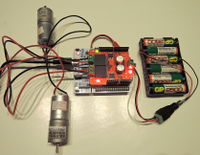
- Mbed program for Monster Moto Shield : http://mbed.org/users/donsez/code/NucleoF401_MonsterMotoShield/
- http://developer.mbed.org/components/SparkFun-Ardumoto-Shield/
- http://developer.mbed.org/components/Sparkuns-Monster-Moto-Shield/
133696 HC-SR04 Ultrasonic Sensor Distance Measuring Module
TODO
Servo Moteurs
TODO
DC motor drivers
- X-NUCLEO-IHM07M1 Three-phase brushless DC motor driver expansion board based on L6230 for STM32 Nucleo
MicroSD
Shields
- https://www.sparkfun.com/products/12761
- https://www.sparkfun.com/products/544 avec http://developer.mbed.org/cookbook/SD-Card-File-System
- http://www.dx.com/p/spi-microsd-card-adapter-v0-9b-for-arduino-works-with-official-arduino-board-246784
DHT11/DHT21/DHT22 etc. Temperature & Humidity sensors
TODO
Bluetooth Low Energy
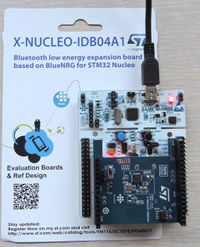
X-NUCLEO-IDB04A1 : Bluetooth low energy expansion board based on BlueNRG for STM32 Nucleo
Wifi
Proximity
MEMS
NFC
LoRa
- Module d'évaluation SX1276 SX1276MB1MAS
- https://www.st.com/en/evaluation-tools/b-l072z-lrwan1.html
- https://www.st.com/en/evaluation-tools/i-nucleo-lrwan1.html
- https://www.st.com/en/evaluation-tools/p-nucleo-lrwan1.html
Sigfox
HC-SR04 Ultrasonic Sensor Distance Measuring Module
/* EXAMPLE */
#include "mbed.h"
#include "hcsr04.h"

//D12 TRIGGER D11 ECHO
HCSR04 sensor(D12, D11);
int main() {
    while(1) {

     long distance = sensor.distance();
      printf("distance  %d  \n",distance);
      wait(1.0); // 1 sec

    }
}
GNSS (GPS/Galileo/Glonass/BeiDou/QZSS)
- X-NUCLEO-GNSS1A1 based on Teseo-LIV3F
