RobAIR2013-RICM5-Suivi/BurnBootloader: Difference between revisions
ElizabethPaz (talk | contribs) (→Steps) |
|||
| (32 intermediate revisions by 2 users not shown) | |||
| Line 3: | Line 3: | ||
= Introduction = |
= Introduction = |
||
This tutorial explains how to use an Arduino board (Arduino Uno) as an AVR ISP (in-system programmer). This allows you to use the board to burn the bootloader onto an AVR (the ATmega168 used in Arduino). This steps have been tested with Arduino 022 and Windows as OS. (Not the same in results on Linux :( ) |
|||
Steps to burn a bootloader onto an ATmega168PA using an Arduino Uno, following the tutorials http://arduino.cc/en/Tutorial/ArduinoISP and http://letsmakerobots.com/node/32096. These instructions are based on Arduino 1.0.4 running on Ubuntu. |
|||
Attention: This is not required for normal use of the [[Dagu Wild Thumper Controller Board]] (normally come with a bootloader). |
|||
= Steps = |
|||
This tutorials is based on the tutorials http://arduino.cc/en/Tutorial/ArduinoISP and http://letsmakerobots.com/node/32096. These instructions are based on Arduino 022 running on Windows (not successful results on Linux). |
|||
1. Open the ArduinoISP firmware (in Examples) to your Arduino board. |
|||
= Instructions = |
|||
2. Select Tools > Board and Serial Port > Arduino Uno (the board that we are using for a programmer) |
|||
* First, Replace the files ''arduino-0022\hardware\arduino\boards.txt'' and ''arduino-0022\hardware\tools\avr\etc\avrdude.conf'' by this two files: [[File:Boards.txt]] and [[File:Avrdude.conf.txt]] |
|||
3. Upload the ArduinoISP sketch into your programmer |
|||
Close the Arduino IDE. |
|||
* Open the IDE. You will see three new boards: |
|||
4. Disconnect the USB cable from the Arduino Uno. |
|||
Open the ArduinoISP firmware (in Examples) to your Arduino board. |
|||
* Select '''Tools > Board''' and '''Tools > Serial Port > Arduino Uno''' (the board that we are using as a programmer) |
|||
5. Wire the Wild Thumper Controller with the Arduino Uno as shown in the picture |
|||
{| |
|||
| [[File:Select-arduino-uno.png|thumb|upright=2|alt=Connection]] |
|||
|} |
|||
* Upload the ArduinoISP sketch into your programmer |
|||
[[File:Wildtrumper-board-isp-bootloader-burning.jpg|thumb|center|upright=2|alt= Wire connection]] |
|||
{| |
|||
[[File:Schema_burn_bootloader.png|thumb|center|upright=2|alt= Wire connection]] |
|||
| [[File:Arduino-isp.jpg|thumb|upright=2|alt=Connection]] |
|||
|} |
|||
* Disconnect the USB cable from the Arduino Uno. |
|||
* Wire the Wild Thumper Controller with the Arduino Uno as shown in the picture |
|||
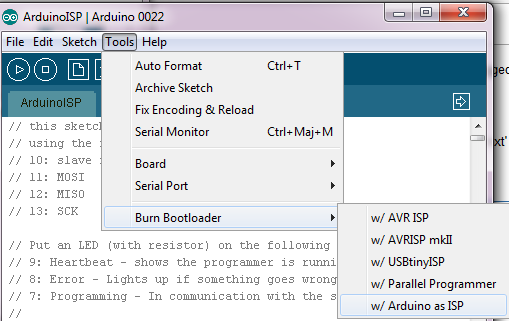
6. Plug in your USB cable to the programmer (Arduino Uno). Select the item in the '''Tools > Board > Arduino Nano w/Atmega 168''', then the item '''Tools > Burn Bootloader > Arduino as ISP'''. |
|||
{| |
|||
| [[File:Wildtrumper-board-isp-bootloader-burning.jpg|thumb|upright=1|alt=Connection]] |
|||
| [[File:Schema_burn_bootloader.png|thumb|upright=3|alt=Schema]] |
|||
|} |
|||
* Plug in your USB cable to the programmer (Arduino Uno). Select the item in the '''Tools > Board > DAGU product w/Atmega 168''', then the item '''Tools > Burn Bootloader > Arduino as ISP'''. |
|||
7. Now click on Burn Bootloader |
|||
{| |
|||
| [[File:Select-arduino-nano.png|thumb|upright=2|alt=Connection]] |
|||
| [[File:Select-arduino-as-isp.png|thumb|upright=2|alt=Schema]] |
|||
|} |
|||
* If this doesn't work, execute cmd.exe and execute the following command: |
|||
8. First try, this error |
|||
C:\Users\....\arduino-0022\hardware/tools/avr/bin/avrdude -CC:\Users\...\arduino-0022\hardware/tools/avr/etc/avrdude.conf<br/> |
|||
-v -v -v -v -patmega168p -cstk500v1 -P\\.\COM4 -b19200 -e -Ulock:w:0x3F:m -Uefuse:w:0x00:m-Uhfuse:w:0xdd:m -Ulfuse:w:0xff:m -F |
|||
You have to complete this command with the exactly location of the folder arduino-0022. |
|||
avrdude: Version 5.11, compiled on Sep 9 2011 at 16:00:41 |
|||
The bootloader have been burn! |
|||
Copyright (c) 2000-2005 Brian Dean, http://www.bdmicro.com/ |
|||
Copyright (c) 2007-2009 Joerg Wunsch |
|||
System wide configuration file is "/home/liz/Documents/ricm5-robair/arduino-1.0.4/hardware/tools/avrdude.conf" |
|||
User configuration file is "/home/liz/.avrduderc" |
|||
User configuration file does not exist or is not a regular file, skipping |
|||
Using Port : /dev/ttyACM0 |
|||
Using Programmer : stk500v1 |
|||
Overriding Baud Rate : 19200 |
|||
avrdude: Send: 0 [30] [20] |
|||
avrdude: Send: 0 [30] [20] |
|||
avrdude: Send: 0 [30] [20] |
|||
avrdude: Recv: . [14] |
|||
avrdude: Recv: . [10] |
|||
AVR Part : ATMEGA168 |
|||
Chip Erase delay : 9000 us |
|||
PAGEL : PD7 |
|||
BS2 : PC2 |
|||
RESET disposition : dedicated |
|||
RETRY pulse : SCK |
|||
serial program mode : yes |
|||
parallel program mode : yes |
|||
Timeout : 200 |
|||
StabDelay : 100 |
|||
CmdexeDelay : 25 |
|||
SyncLoops : 32 |
|||
ByteDelay : 0 |
|||
PollIndex : 3 |
|||
PollValue : 0x53 |
|||
Memory Detail : |
|||
Block Poll Page Polled |
|||
Memory Type Mode Delay Size Indx Paged Size Size #Pages MinW MaxW ReadBack |
|||
----------- ---- ----- ----- ---- ------ ------ ---- ------ ----- ----- --------- |
|||
eeprom 65 20 4 0 no 512 4 0 3600 3600 0xff 0xff |
|||
Block Poll Page Polled |
|||
Memory Type Mode Delay Size Indx Paged Size Size #Pages MinW MaxW ReadBack |
|||
----------- ---- ----- ----- ---- ------ ------ ---- ------ ----- ----- --------- |
|||
flash 65 6 128 0 yes 16384 128 128 4500 4500 0xff 0xff |
|||
Block Poll Page Polled |
|||
Memory Type Mode Delay Size Indx Paged Size Size #Pages MinW MaxW ReadBack |
|||
----------- ---- ----- ----- ---- ------ ------ ---- ------ ----- ----- --------- |
|||
lfuse 0 0 0 0 no 1 0 0 4500 4500 0x00 0x00 |
|||
Block Poll Page Polled |
|||
Memory Type Mode Delay Size Indx Paged Size Size #Pages MinW MaxW ReadBack |
|||
----------- ---- ----- ----- ---- ------ ------ ---- ------ ----- ----- --------- |
|||
hfuse 0 0 0 0 no 1 0 0 4500 4500 0x00 0x00 |
|||
Block Poll Page Polled |
|||
Memory Type Mode Delay Size Indx Paged Size Size #Pages MinW MaxW ReadBack |
|||
----------- ---- ----- ----- ---- ------ ------ ---- ------ ----- ----- --------- |
|||
efuse 0 0 0 0 no 1 0 0 4500 4500 0x00 0x00 |
|||
Block Poll Page Polled |
|||
Memory Type Mode Delay Size Indx Paged Size Size #Pages MinW MaxW ReadBack |
|||
----------- ---- ----- ----- ---- ------ ------ ---- ------ ----- ----- --------- |
|||
lock 0 0 0 0 no 1 0 0 4500 4500 0x00 0x00 |
|||
Block Poll Page Polled |
|||
Memory Type Mode Delay Size Indx Paged Size Size #Pages MinW MaxW ReadBack |
|||
----------- ---- ----- ----- ---- ------ ------ ---- ------ ----- ----- --------- |
|||
calibration 0 0 0 0 no 1 0 0 0 0 0x00 0x00 |
|||
Block Poll Page Polled |
|||
Memory Type Mode Delay Size Indx Paged Size Size #Pages MinW MaxW ReadBack |
|||
----------- ---- ----- ----- ---- ------ ------ ---- ------ ----- ----- --------- |
|||
signature 0 0 0 0 no 3 0 0 0 0 0x00 0x00 |
|||
Programmer Type : STK500 |
|||
Description : Atmel STK500 Version 1.x firmware |
|||
avrdude: Send: A [41] . [80] [20] |
|||
avrdude: Recv: . [14] |
|||
avrdude: Recv: . [10] |
|||
avrdude: Recv: . [14] |
|||
avrdude: stk500_getparm(): (a) protocol error, expect=0x14, resp=0x14 |
|||
avrdude: Send: A [41] . [81] [20] |
|||
avrdude: Recv: . [02] |
|||
avrdude: stk500_getparm(): (a) protocol error, expect=0x14, resp=0x02 |
|||
avrdude: Send: A [41] . [82] [20] |
|||
avrdude: Recv: . [10] |
|||
avrdude: stk500_getparm(): (a) protocol error, expect=0x14, resp=0x10 |
|||
avrdude: Send: A [41] . [98] [20] |
|||
avrdude: Recv: . [14] |
|||
avrdude: Recv: . [01] |
|||
avrdude: Recv: . [10] |
|||
Hardware Version: 0 |
|||
Firmware Version: 0.4232850 |
|||
Topcard : STK502 |
|||
avrdude: Send: A [41] . [84] [20] |
|||
avrdude: Recv: . [14] |
|||
avrdude: Recv: . [12] |
|||
avrdude: Recv: . [10] |
|||
avrdude: Send: A [41] . [85] [20] |
|||
avrdude: Recv: . [14] |
|||
avrdude: Recv: . [00] |
|||
avrdude: Recv: . [10] |
|||
avrdude: Send: A [41] . [86] [20] |
|||
avrdude: Recv: . [14] |
|||
avrdude: Recv: . [00] |
|||
avrdude: Recv: . [10] |
|||
avrdude: Send: A [41] . [87] [20] |
|||
avrdude: Recv: . [14] |
|||
avrdude: Recv: . [00] |
|||
avrdude: Recv: . [10] |
|||
avrdude: Send: A [41] . [89] [20] |
|||
avrdude: Recv: . [14] |
|||
avrdude: Recv: . [00] |
|||
avrdude: Recv: . [10] |
|||
Vtarget : 1.8 V |
|||
Varef : 0.0 V |
|||
Oscillator : Off |
|||
SCK period : 0.1 us |
|||
avrdude: Send: A [41] . [81] [20] |
|||
avrdude: Recv: . [14] |
|||
avrdude: Recv: . [00] |
|||
avrdude: Recv: . [10] |
|||
avrdude: Send: A [41] . [82] [20] |
|||
avrdude: Recv: . [14] |
|||
avrdude: Recv: . [00] |
|||
avrdude: Recv: . [10] |
|||
avrdude: Send: B [42] . [86] . [00] . [00] . [01] . [01] . [01] . [01] . [03] . [ff] . [ff] . [ff] . [ff] . [00] . [80] . [02] . [00] . [00] . [00] @ [40] . [00] [20] |
|||
avrdude: Recv: . [14] |
|||
avrdude: Recv: . [01] |
|||
avrdude: stk500_initialize(): (b) protocol error, expect=0x10, resp=0x01 |
|||
avrdude: initialization failed, rc=-1 |
|||
Double check connections and try again, or use -F to override |
|||
this check. |
|||
avrdude: Send: Q [51] [20] |
|||
avrdude: Recv: . [10] |
|||
avrdude: stk500_disable(): protocol error, expect=0x14, resp=0x10 |
|||
avrdude done. Thank you. |
|||
* Close all Arduino IDE windows |
|||
* Open arduino-0022\arduino-0022\lib\preferences.txt and change: ''upload.using=bootloader'' by ''upload.using=arduinoisp'' |
|||
* Open the Arduino IDE, open your sketch. Make sure '''Tools > Board''' is set to the target chip. |
|||
8. Second try: |
|||
* Compile and upload the sketch |
|||
avrdude: Version 5.11, compiled on Sep 9 2011 at 16:00:41 |
|||
Copyright (c) 2000-2005 Brian Dean, http://www.bdmicro.com/ |
|||
Copyright (c) 2007-2009 Joerg Wunsch |
|||
System wide configuration file is "/home/liz/Documents/ricm5-robair/arduino-1.0.4/hardware/tools/avrdude.conf" |
|||
User configuration file is "/home/liz/.avrduderc" |
|||
User configuration file does not exist or is not a regular file, skipping |
|||
Using Port : /dev/ttyACM0 |
|||
Using Programmer : stk500v1 |
|||
Overriding Baud Rate : 19200 |
|||
avrdude: Send: 0 [30] [20] |
|||
avrdude: Send: 0 [30] [20] |
|||
avrdude: Send: 0 [30] [20] |
|||
avrdude: Recv: . [14] |
|||
avrdude: Recv: . [10] |
|||
AVR Part : ATMEGA168 |
|||
Chip Erase delay : 9000 us |
|||
PAGEL : PD7 |
|||
BS2 : PC2 |
|||
RESET disposition : dedicated |
|||
RETRY pulse : SCK |
|||
serial program mode : yes |
|||
parallel program mode : yes |
|||
Timeout : 200 |
|||
StabDelay : 100 |
|||
CmdexeDelay : 25 |
|||
SyncLoops : 32 |
|||
ByteDelay : 0 |
|||
PollIndex : 3 |
|||
PollValue : 0x53 |
|||
Memory Detail : |
|||
Block Poll Page Polled |
|||
Memory Type Mode Delay Size Indx Paged Size Size #Pages MinW MaxW ReadBack |
|||
----------- ---- ----- ----- ---- ------ ------ ---- ------ ----- ----- --------- |
|||
eeprom 65 20 4 0 no 512 4 0 3600 3600 0xff 0xff |
|||
Block Poll Page Polled |
|||
Memory Type Mode Delay Size Indx Paged Size Size #Pages MinW MaxW ReadBack |
|||
----------- ---- ----- ----- ---- ------ ------ ---- ------ ----- ----- --------- |
|||
flash 65 6 128 0 yes 16384 128 128 4500 4500 0xff 0xff |
|||
Block Poll Page Polled |
|||
Memory Type Mode Delay Size Indx Paged Size Size #Pages MinW MaxW ReadBack |
|||
----------- ---- ----- ----- ---- ------ ------ ---- ------ ----- ----- --------- |
|||
lfuse 0 0 0 0 no 1 0 0 4500 4500 0x00 0x00 |
|||
Block Poll Page Polled |
|||
Memory Type Mode Delay Size Indx Paged Size Size #Pages MinW MaxW ReadBack |
|||
----------- ---- ----- ----- ---- ------ ------ ---- ------ ----- ----- --------- |
|||
hfuse 0 0 0 0 no 1 0 0 4500 4500 0x00 0x00 |
|||
Block Poll Page Polled |
|||
Memory Type Mode Delay Size Indx Paged Size Size #Pages MinW MaxW ReadBack |
|||
----------- ---- ----- ----- ---- ------ ------ ---- ------ ----- ----- --------- |
|||
efuse 0 0 0 0 no 1 0 0 4500 4500 0x00 0x00 |
|||
Block Poll Page Polled |
|||
Memory Type Mode Delay Size Indx Paged Size Size #Pages MinW MaxW ReadBack |
|||
----------- ---- ----- ----- ---- ------ ------ ---- ------ ----- ----- --------- |
|||
lock 0 0 0 0 no 1 0 0 4500 4500 0x00 0x00 |
|||
Block Poll Page Polled |
|||
Memory Type Mode Delay Size Indx Paged Size Size #Pages MinW MaxW ReadBack |
|||
----------- ---- ----- ----- ---- ------ ------ ---- ------ ----- ----- --------- |
|||
calibration 0 0 0 0 no 1 0 0 0 0 0x00 0x00 |
|||
Block Poll Page Polled |
|||
Memory Type Mode Delay Size Indx Paged Size Size #Pages MinW MaxW ReadBack |
|||
----------- ---- ----- ----- ---- ------ ------ ---- ------ ----- ----- --------- |
|||
signature 0 0 0 0 no 3 0 0 0 0 0x00 0x00 |
|||
Programmer Type : STK500 |
|||
Description : Atmel STK500 Version 1.x firmware |
|||
avrdude: Send: A [41] . [80] [20] |
|||
avrdude: Recv: . [14] |
|||
avrdude: Recv: . [10] |
|||
avrdude: Recv: . [14] |
|||
avrdude: stk500_getparm(): (a) protocol error, expect=0x14, resp=0x14 |
|||
avrdude: Send: A [41] . [81] [20] |
|||
avrdude: Recv: . [02] |
|||
avrdude: stk500_getparm(): (a) protocol error, expect=0x14, resp=0x02 |
|||
avrdude: Send: A [41] . [82] [20] |
|||
avrdude: Recv: . [10] |
|||
avrdude: stk500_getparm(): (a) protocol error, expect=0x14, resp=0x10 |
|||
avrdude: Send: A [41] . [98] [20] |
|||
avrdude: Recv: . [14] |
|||
avrdude: Recv: . [01] |
|||
avrdude: Recv: . [10] |
|||
Hardware Version: 0 |
|||
Firmware Version: 0.4232850 |
|||
Topcard : STK502 |
|||
avrdude: Send: A [41] . [84] [20] |
|||
avrdude: Recv: . [14] |
|||
avrdude: Recv: . [12] |
|||
avrdude: Recv: . [10] |
|||
avrdude: Send: A [41] . [85] [20] |
|||
avrdude: Recv: . [14] |
|||
avrdude: Recv: . [00] |
|||
avrdude: Recv: . [10] |
|||
avrdude: Send: A [41] . [86] [20] |
|||
avrdude: Recv: . [14] |
|||
avrdude: Recv: . [00] |
|||
avrdude: Recv: . [10] |
|||
avrdude: Send: A [41] . [87] [20] |
|||
avrdude: Recv: . [14] |
|||
avrdude: Recv: . [00] |
|||
avrdude: Recv: . [10] |
|||
avrdude: Send: A [41] . [89] [20] |
|||
avrdude: Recv: . [14] |
|||
avrdude: Recv: . [00] |
|||
avrdude: Recv: . [10] |
|||
Vtarget : 1.8 V |
|||
Varef : 0.0 V |
|||
Oscillator : Off |
|||
SCK period : 0.1 us |
|||
avrdude: Send: A [41] . [81] [20] |
|||
avrdude: Recv: . [14] |
|||
avrdude: Recv: . [00] |
|||
avrdude: Recv: . [10] |
|||
avrdude: Send: A [41] . [82] [20] |
|||
avrdude: Recv: . [14] |
|||
avrdude: Recv: . [00] |
|||
avrdude: Recv: . [10] |
|||
avrdude: Send: B [42] . [86] . [00] . [00] . [01] . [01] . [01] . [01] . [03] . [ff] . [ff] . [ff] . [ff] . [00] . [80] . [02] . [00] . [00] . [00] @ [40] . [00] [20] |
|||
avrdude: Recv: . [14] |
|||
avrdude: Recv: . [01] |
|||
avrdude: stk500_initialize(): (b) protocol error, expect=0x10, resp=0x01 |
|||
avrdude: initialization failed, rc=-1 |
|||
Double check connections and try again, or use -F to override |
|||
this check. |
|||
avrdude: Send: Q [51] [20] |
|||
avrdude: Recv: . [10] |
|||
avrdude: stk500_disable(): protocol error, expect=0x14, resp=0x10 |
|||
avrdude done. Thank you. |
|||
Latest revision as of 09:22, 10 May 2013
Burning the Arduino Bootloader onto an ATmega168PA using an Arduino Uno
Introduction
This tutorial explains how to use an Arduino board (Arduino Uno) as an AVR ISP (in-system programmer). This allows you to use the board to burn the bootloader onto an AVR (the ATmega168 used in Arduino). This steps have been tested with Arduino 022 and Windows as OS. (Not the same in results on Linux :( )
Attention: This is not required for normal use of the Dagu Wild Thumper Controller Board (normally come with a bootloader).
This tutorials is based on the tutorials http://arduino.cc/en/Tutorial/ArduinoISP and http://letsmakerobots.com/node/32096. These instructions are based on Arduino 022 running on Windows (not successful results on Linux).
Instructions
- First, Replace the files arduino-0022\hardware\arduino\boards.txt and arduino-0022\hardware\tools\avr\etc\avrdude.conf by this two files: File:Boards.txt and File:Avrdude.conf.txt
Close the Arduino IDE.
- Open the IDE. You will see three new boards:
Open the ArduinoISP firmware (in Examples) to your Arduino board.
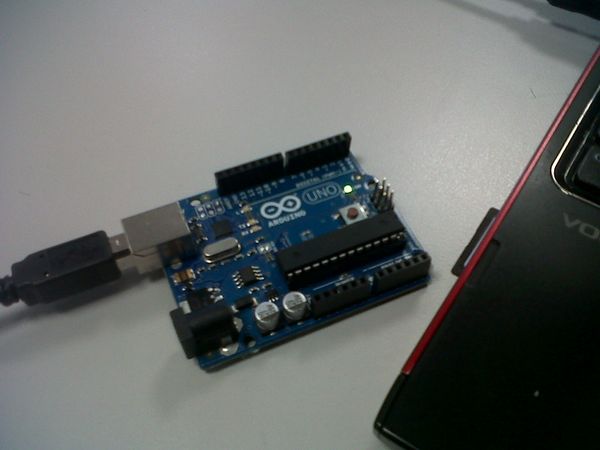
- Select Tools > Board and Tools > Serial Port > Arduino Uno (the board that we are using as a programmer)
- Upload the ArduinoISP sketch into your programmer
- Disconnect the USB cable from the Arduino Uno.
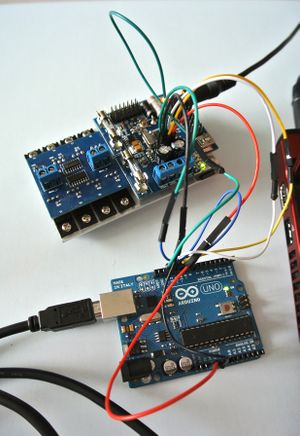
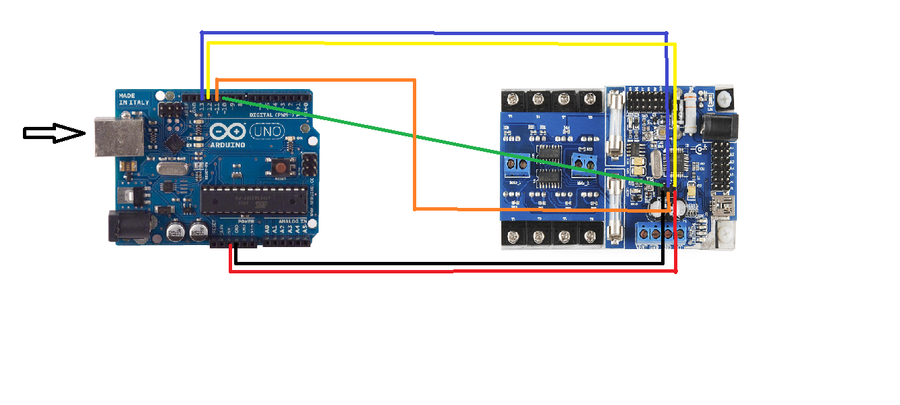
- Wire the Wild Thumper Controller with the Arduino Uno as shown in the picture
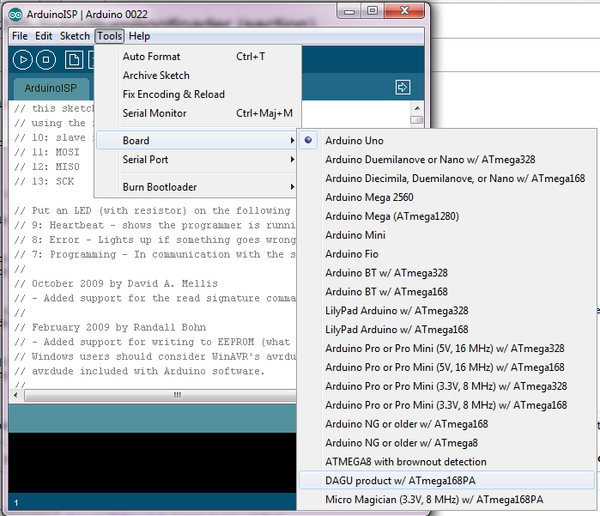
- Plug in your USB cable to the programmer (Arduino Uno). Select the item in the Tools > Board > DAGU product w/Atmega 168, then the item Tools > Burn Bootloader > Arduino as ISP.
- If this doesn't work, execute cmd.exe and execute the following command:
C:\Users\....\arduino-0022\hardware/tools/avr/bin/avrdude -CC:\Users\...\arduino-0022\hardware/tools/avr/etc/avrdude.conf

-v -v -v -v -patmega168p -cstk500v1 -P\\.\COM4 -b19200 -e -Ulock:w:0x3F:m -Uefuse:w:0x00:m-Uhfuse:w:0xdd:m -Ulfuse:w:0xff:m -F
You have to complete this command with the exactly location of the folder arduino-0022. The bootloader have been burn!
- Close all Arduino IDE windows
- Open arduino-0022\arduino-0022\lib\preferences.txt and change: upload.using=bootloader by upload.using=arduinoisp
- Open the Arduino IDE, open your sketch. Make sure Tools > Board is set to the target chip.
- Compile and upload the sketch

