RobAIR2013-RICM5-Suivi/BurnBootloader: Difference between revisions
ElizabethPaz (talk | contribs) (→Steps) |
ElizabethPaz (talk | contribs) (→Steps) |
||
| Line 17: | Line 17: | ||
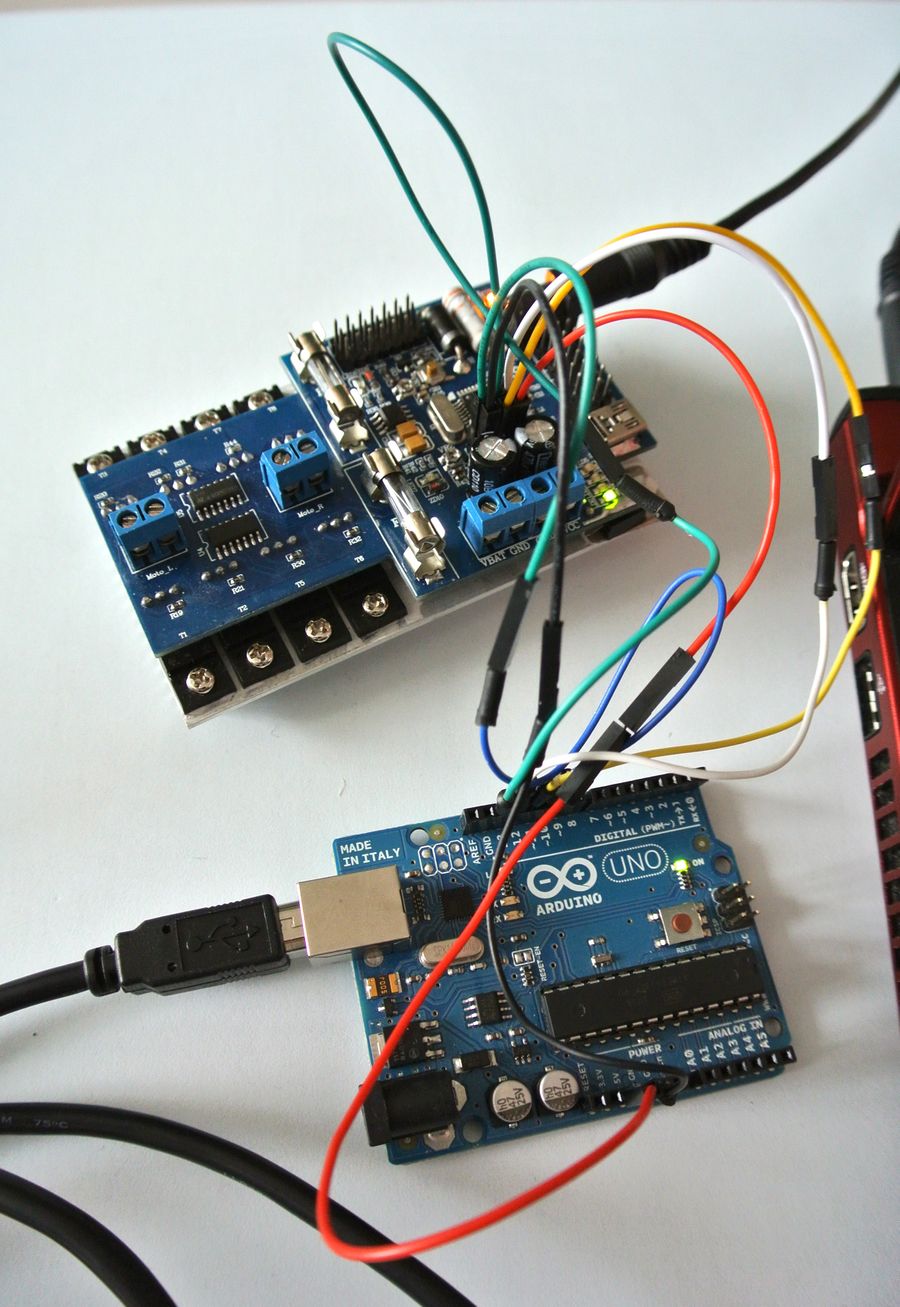
5. Wire the Wild Thumper Controller with the Arduino Uno as shown in the picture |
5. Wire the Wild Thumper Controller with the Arduino Uno as shown in the picture |
||
[[File:Wildtrumper-board-isp-bootloader-burning.jpg |
[[File:Wildtrumper-board-isp-bootloader-burning.jpg|thumb|center|upright=3|alt= Wire connection]] |
||
6. Plug in your USB cable to the programmer (Arduino Uno). Select the item in the '''Tools > Board > Arduino Nano w/Atmega 168''', then the item '''Tools > Burn Bootloader > Arduino as ISP'''. |
6. Plug in your USB cable to the programmer (Arduino Uno). Select the item in the '''Tools > Board > Arduino Nano w/Atmega 168''', then the item '''Tools > Burn Bootloader > Arduino as ISP'''. |
||
Revision as of 10:51, 13 March 2013
Burning the Arduino Bootloader onto an ATmega168PA using an Arduino Uno
Introduction
Steps to burn a bootloader onto an ATmega168PA using an Arduino Uno, following the tutorials http://arduino.cc/en/Tutorial/ArduinoISP and http://letsmakerobots.com/node/32096. These instructions are based on Arduino 1.0.4 running on Ubuntu.
Steps
1. Open the ArduinoISP firmware (in Examples) to your Arduino board.
2. Select Tools > Board and Serial Port > Arduino Uno (the board that we are using for a programmer)
3. Upload the ArduinoISP sketch into your programmer
4. Disconnect the USB cable from the Arduino Uno.
5. Wire the Wild Thumper Controller with the Arduino Uno as shown in the picture
6. Plug in your USB cable to the programmer (Arduino Uno). Select the item in the Tools > Board > Arduino Nano w/Atmega 168, then the item Tools > Burn Bootloader > Arduino as ISP.
7. Now click on Burn Bootloader
