Difference between revisions of "Premiers Pas avec Raspberry Pi et Arduino"
Jump to navigation
Jump to search
(Created page with "Interfacer le Raspberry Pi et une carte Arduino peut être utile pour de nombreux projets (M2M, Robotique, ...). * Via USB : http://blog.oscarliang.net/conn...") |
|||
| Line 1: | Line 1: | ||
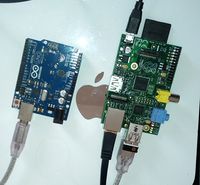
| + | [[Image:rpi+arduino.jpg|200px|thumb|right|Collecte de mesures avec un Arduino Raspberry Pi]] |
||
| + | |||
| + | |||
| + | |||
Interfacer le [[Raspberry Pi]] et une carte [[Arduino]] peut être utile pour de nombreux projets ([[M2M]], [[Robotique]], ...). |
Interfacer le [[Raspberry Pi]] et une carte [[Arduino]] peut être utile pour de nombreux projets ([[M2M]], [[Robotique]], ...). |
||
Revision as of 11:23, 14 August 2013
Interfacer le Raspberry Pi et une carte Arduino peut être utile pour de nombreux projets (M2M, Robotique, ...).
- Via USB : http://blog.oscarliang.net/connect-raspberry-pi-and-arduino-usb-cable/
- Via GPIO : http://blog.oscarliang.net/raspberry-pi-and-arduino-connected-serial-gpio/
Read http://playground.arduino.cc/Interfacing/Python
Install pySerial
sudo apt-get install python-serial
Check the Arduino tty port
ls /dev/tty*
Download the following sketch on the Arduino board (using the Arduino IDE)
void setup() {
  Serial.begin(9600);
}

void loop() {
  int sensorValue = analogRead(A0);
  Serial.println(sensorValue);
  delay(1000);
}
Run the following python script
import serial
ser = serial.Serial('/dev/ttyACM0', 9600)
while True :
    print ser.readline()
More test
Download the following sketch on the Arduino board (using the Arduino IDE)
// from http://blog.oscarliang.net/connect-raspberry-pi-and-arduino-usb-cable/
const int ledPin = 13;

void setup(){
  pinMode(ledPin, OUTPUT);
  Serial.begin(9600);
}
void loop(){
  if (Serial.available())  {
     light(Serial.read() - '0');
  }
  delay(500);
}

void light(int n){
  for (int i = 0; i < n; i++)  {
    digitalWrite(ledPin, HIGH);
    delay(100);
    digitalWrite(ledPin, LOW);
   delay(100);
  }
}
Run the following python script
import serial
ser = serial.Serial('/dev/ttyACM0', 9600)
ser.write('10')
More with Firmata : https://github.com/lupeke/python-firmata/
Download the firmata sketch on the Arduino board (using the Arduino IDE > Examples > Firmata > StandardFirmata)
Run the following python script
from firmata import *

a = Arduino('/dev/ttyACM0')
a.pin_mode(13, firmata.OUTPUT)
a.delay(2)

while True:
    a.digital_write(13, firmata.HIGH)
    a.delay(2)
    a.digital_write(13, firmata.LOW)
    a.delay(2)
