Tabletop

- UE/Module: Projet innovant de RICM4 option CM
- Enseignant: Didier Donsez
- Elèves RICM4: Christophe Havard (chef de projet), Renaud Collin, Sebastien Skorupski
Introduction
Les technologies utilisées sont Flash (AS3) pour le codage de l'application, NFC pour l'identification et le paiement des utilisateurs.
Présentation commerciale du projet : AIR_NFC_TableTop
Les actualités du projet en anglais sur notre blog
Objectifs
Les objectifs du projet sont
- de réaliser la partie matériel d'un tabletop à faible coût
- d'évaluer les canevas de développement d'IHM multipoint (Flash/Android, C#/.NET/Windows7)
- de réaliser une application pour une table de restaurant (affichage des plats, commande, addition, enquête de satisfaction ...)
- d'utiliser la technologie NFC (Near Field Communication) pour permettre aux utilisateurs de s'identifier et payer via leur téléphone mobile
Ces informations peuvent être injectées dans un monde virtuelle d'avatars. Inversement, les capteurs et les usagers peuvent être simulés et représentés dans le monde réel augmenté. Pour cela, vous utiliserez DiaSuite.
Table Tactile
Matériel
- Table en verre IKEA (60")
- Miroir
- Mac Mini
- Videoprojecteur short-throw
- Illuminateur IR
- Webcam PS3 modifiée (IR filter removed & visible light bandpass filter added)
- Lentille grand angle (m12/0.5mm mount, 1.8mm, angle of view = 170°)
- RFID Reader (ACS ACR 122 RFID reader)

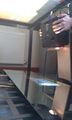
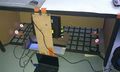
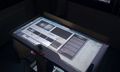
Installation matérielle
- La surface vitrée de la table est recouverte de papier calque afin de capter l'image du vidéo projecteur. - Le bord supérieur de la table est percé afin de pouvoir fixer un support pour le vidéo-projecteur. - Un miroir est placé de telle sorte à renvoyer l'image du vidéo-projecteur vers la surface vitrée - Des lampes infrarouges sont placés à l'intérieur de la table afin de diffuser des ondes infrarouge vers la surface vitrée. - La webcam est pointée vers la surface vitrée. - Des pièces de cartons sont découpés et placées autour de la table afin de la protéger de perturbations extérieures.
AIR NFC TableTop 1
AIR NFC TableTop 2
AIR NFC TableTop 3


Installation logicielle
- CCV (Community Core Vision) CCV
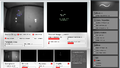
Community Core Vision

Premières Démos
Module NFC
Matériel
- ACR122 NFC reader : drivers
Environnement Logiciel
Ce document est basé sur le fichier README-Windows.txt disponible dans l'archive libnfc-1.4.2 [www.libnfc.org]
Prérequis
Afin de pouvoir interagir avec l'ACR122 les logiciels suivants doivent-être téléchargés:
Installation
Testée sous Windows XP/SP3 32 bit.
1.1) Setup MinGW !!!Important!!! Make sure to select MinGW-w64 in the installer, the regular MinGW does not contain headers for PCSC. 1.2)Add the following directories to your PATH : c:\MinGW64\bin;c:\MinGW64\x86_64-w64-mingw32\lib32;c:\MinGW64\x86_64-w64-mingw32\include
2.1) Unzip libusb-win32-bin-1.x to c:\Program Files\LibUSB-Win32 2.2) Read libusb-win32-bin-README to know where to place the dll and the sys file.
3) Setup CMake (When asked, choose "Add Cmake to the system PATH")
4.1)Create a new folder which will contain nfc src and nfc build, for an example C:\NFC\ 4.2)Extract the libnfc archive to c:\NFC\libnfc-src 4.2)Create C:\NFC\libnfc-build folder 4.3)Lunch notepad and paste the following instruction :
 cd c:\NFC\libnfc-build
 cmake -G "MinGW Makefiles" -DCMAKE_BUILD_TYPE=Release c:\NFC\libnfc-src
 mingw32-make
 cd ..
4.4)Save the file to C:\NFC\make.bat
5) Run make.bat
6) Copy c:\NFC\libnfc-build\libnfc\libnfc.dll to c:\windows\system32
Adding new examples files
=============
To add an example: - put your .c file in c:\NFC\libnfc-src\examples - edit examples\CMakeLists.txt and:
* add your binary target in the SET section
- run make.bat from c:\NFC\ directory - your binary file is in libnfc-build\examples