Projets-2015-2016-IaaS Docker
Project presentation
Introduction
The objective of this project is to allow a user group (member) to pool their laptops or desktop in order to calculate big data of few users. To do so, the solution should work with Docker to virtualize user machines and control the use of resources of each machine.
Project under GPLv3 licence : https://www.gnu.org/licenses/gpl-3.0.fr.html
The team
RICM5 students
- EUDES Robin
- DAMOTTE Alan
- BARTHELEMY Romain
- MAMMAR Malek
- GUO Kai
Supervisors Pierre-Yves Gibello (Linagora), Vincent Zurczak (Linagora), Didier Donsez
Deliverables
Specifications (written in French)
Management of innovative projects (MPI) report (written in French)
Roadmap
Our waffle shows our current roadmap and the different tasks we are working on. The aim of this section is to gather all the ideas we have which would be good to implement in the future to improve the service (after the end of our project).
User experience:
- Add a way to report bad behaviour of providers or clients
- Implement public profile: at the moment, users can only access their private profile. We imagine that we can consult providers profile to see which one is best rated
- Add the possibility for clients to use the rating system to choose only the best rated providers (special package, more expensive of course)
Monetary system:
- Implement monetary system for providers and clients
- Set different possible packages at different prices and for different levels of service
Algorithms:
- Implement algorithm that optimize geographic allocation between providers and clients (better network): it's better for both clients and providers to be on the same geographical area
- Implement active replication in case a provider suddenly stops his machine
- Reallocate the instances to another provider when the first one decides to cleanly stop his machine (docker commit/docker pull)
- Optimize disk usage and bandwidth allocation
Security:
- Find way to prevent provider to enter in the instance and do whatever he wants, or see what each instances running on his machines contains (difficult): since providers are admin of their machine they can see what the containers contain, or enter the containers. It would be good to guarantee clients that their instances are totally safe, and no one, including the provider, can access their information.
Planning
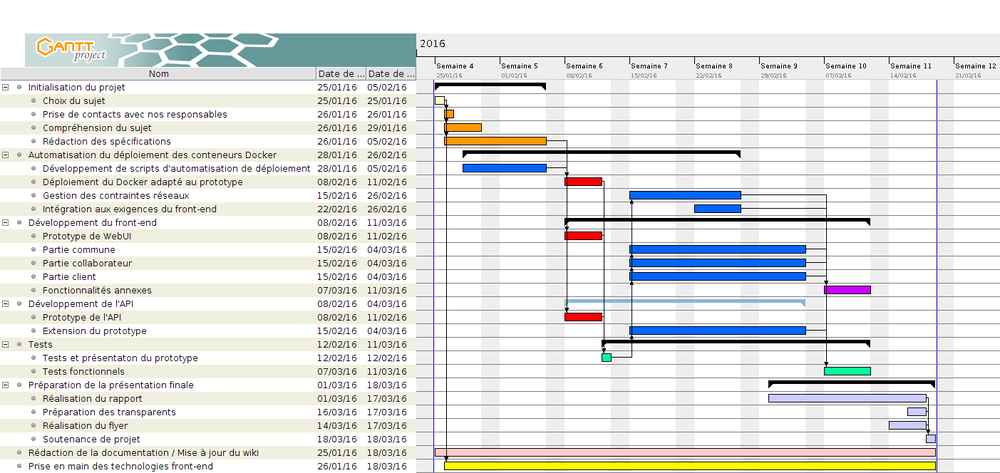
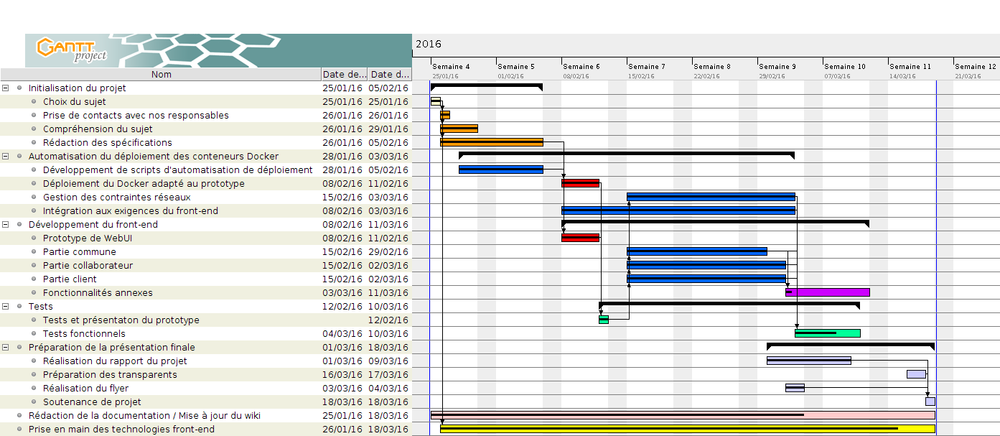
Week 1: January 25th - January 31th
- Getting familiar with Docker (for some of the group members)
- Fix Docker's DNS issue using public network (wifi-campus/eduroam)
- Contacting our supervisors
- First thoughts on this project, what we could do
- Redaction of specifications, creation of architecture diagrams
- Create scripts that start/stop containers automatically (some modifications still need to be done)
Week 2: February 1st - February 7th
- Manage and limit space disk usage of each container, limit resources allocation at containers' launch.
- CPU and memory allocation: ok
- Docker doesn't seem to implement easy way to limit container's disk usage: implementing a watchdog (script) which will check container's disk usage and stop those that exceed a limit
- Think about restricted access to Docker containers: for the moment, providers are admin and can easily access containers
- See how instances can easily give their network information to coordinator
- Get familiar with Shinken and study the possibilities
- Specification of technologies used
- End of specification redaction + feedback from tutors
- Start to work on Meteor-AngularJS tutorials
- Configure a personal VM for the frontend & setup meteor-angular on it
Week 3: February 8th - February 14th
- Objective for this week: get a prototype that contains a basic front-end which makes it possible to launch remote Docker instance.
- Container deployment:
- Deploy all containers on the same network: that allows us to connect to the instances from the coordinator
- Create user on host: will be used to connect ourselves in ssh from coordinator instance to host and launch deployment scripts
- Create script that totally automatizes user creation, images creation and build, coordinator's and shinken's containers launch
- At the end of the week, the prototype is working: we can launch an instance an a provider machine from the front-end. We still need to establish and test the connection between a client and his instance. We have a good cornerstone of our project yet.
Week 4: February 15th - February 21st
- Try to establish a connection between a client and his container
- Continue client/provider's web page development on front-end
- Start editing help page
- Correct some responsive effects on the site
- Container deployment:
- Implement bandwidth restriction
- Create script that automatically set client public key in container's authorized_keys file, modify some script to automatically delete client public key in coordinator's authorized_keys file
- Start to study and set up Rabbitmq (publish from provider to front-end for example)
Week 5: February 22nd - February 28th (Vacation)
- Update wiki/help page, work on some responsive issues on the website
- Establish script that automatically create SSH-jump config for the client
- Work on foreign keys and database (front-end side)
- Continue front-end development
- Establish rabbitmq on both front-end side and provider side
Week 6: February 29th - March 6th
- Container's deployment:
- Modify coordinator Dockerfile to install nodejs
- Create a cron job that will run a command every 30 seconds: that command will be used to send the file that contains container's information to rabbitmq server
- Modify coordinator to set up 2 users: one for the front-end and one for the clients. Each one will contain only the public key they need in authorized_keys' file
- Modify startProvider script to check is ssh-server is installed and running on provider, and change default port (22 to 22000)
- Modify watchdog functioning: up to now, the script was just checking if each instance was respecting a limit. Now its behaviour allows us to have different disk usage for each instance. Now we use a cron job, we won't need anymore to launch the script by ourselves
- Change monitoring system: we found an other monitoring system for Docker called cAdvisor which gives us enough informations about containers.
- Frontend dev:
- Generate a proper & unique instance name : <username>-<provider_domain_name>-<num_instance_user_at_provider> eg. : toto-domain1-0
- Add form to modify provider machines informations
- Fix warning "CSS file deliver as html file" by Meteor
- Add README to explain how to use scripts, how files are organized (for github branch : frontendWebui , docker , master )
- Improve user feedback (notifications) on errors/success
- Proper parameters to start/stop instances
- Add username field in profile
- Resolve bugs occurring when the machines allocate resources from a different user
- Test and feedback:
- Set up the main test: container deployment and access to instance from the client
- Some permissions on coordinator instance needed to be changed
- SSH default configuration needed to be changed to: disable root login and authentication by password
- Connection from client to his instance is working
=> The main development phase is finished since we have a working base. We still need to improve some things, eventually develop some advanced functionalities during the last two weeks.
Week 7: March 7th - March 13th
- Finish creating the flyer
- Write report for our last MPI course
- End of Rabbitmq set up on front-end
- Test complete loop:
- Create profile
- Set required information (ssh public key)
- As a provider, give settings of the provided machine
- As a client, ask for an instance
- As a client connect to the instance (ssh)
- Check that Rabbitmq is correctly tracing back information about containers/instances
- Add a rating system which will be used to give a mark to providers.
- Start preparing the presentation
Week 8: March 14th - March 17th
- Finish presentation preparation
- Fix some bugs:
- Start instances if they already exist
- Stop instances and no longer remove them in order to be reused/started again
- Really remove client instances running on provider when he choose to not be available
- Others minor fixes
What is Docker?
Docker allows you to package an application with all of its dependencies into a standardized unit for software development. Docker containers wrap up a piece of software in a complete filesystem that contains everything it needs to run: code, runtime, system tools, system libraries – anything you can install on a server. This guarantees that it will always run the same, regardless of the environment it is running in.
Lightweight: Containers running on a single machine all share the same operating system kernel so they start instantly and make more efficient use of RAM. Images are constructed from layered filesystems so they can share common files, making disk usage and image downloads much more efficient.
Open: Docker containers are based on open standards allowing containers to run on all major Linux distributions and Microsoft operating systems with support for every infrastructure.
Secure: Containers isolate applications from each other and the underlying infrastructure while providing an added layer of protection for the application.
How is this different from virtual machines?
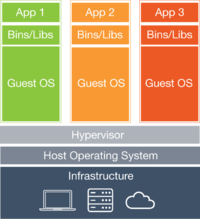
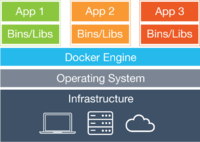
Containers have similar resource isolation and allocation benefits as virtual machines but a different architectural approach allows them to be much more portable and efficient.
Virtual Machines: Each virtual machine includes the application, the necessary binaries and libraries and an entire guest operating system - all of which may be tens of GBs in size.
Containers: Containers include the application and all of its dependencies, but share the kernel with other containers. They run as an isolated process in userspace on the host operating system. They’re also not tied to any specific infrastructure – Docker containers run on any computer, on any infrastructure and in any cloud.
How does this help you build better software?
When your app is in Docker containers, you don’t have to worry about setting up and maintaining different environments or different tooling for each language. Focus on creating new features, fixing issues and shipping software.
Accelerate Developer Onboarding: Stop wasting hours trying to setup developer environments, spin up new instances and make copies of production code to run locally. With Docker, you can easily take copies of your live environment and run on any new endpoint running Docker.
Empower Developer Creativity: The isolation capabilities of Docker containers free developers from the worries of using “approved” language stacks and tooling. Developers can use the best language and tools for their application service without worrying about causing conflict issues.
Eliminate Environment Inconsistencies: By packaging up the application with its configs and dependencies together and shipping as a container, the application will always work as designed locally, on another machine, in test or production. No more worries about having to install the same configs into a different environment.
Docker creates a common framework for developers and sysadmins to work together on distributed applications
Distribute and share content: Store, distribute and manage your Docker images in your Docker Hub with your team. Image updates, changes and history are automatically shared across your organization.
Simply share your application with others: Ship one or many containers to others or downstream service teams without worrying about different environment dependencies creating issues with your application. Other teams can easily link to or test against your app without having to learn or worry about how it works.
Ship More Software Faster
Docker allows you to dynamically change your application like never before from adding new capabilities, scaling out services to quickly changing problem areas.
Ship 7X More: Docker users on average ship software 7X more after deploying Docker in their environment. More frequent updates provide more value to your customers faster.
Quickly Scale: Docker containers spin up and down in seconds making it easy to scale an application service at any time to satisfy peak customer demand, then just as easily spin down those containers to only use the resources you need when you need it
Easily Remediate Issues: Docker make it easy to identify issues and isolate the problem container, quickly roll back to make the necessary changes then push the updated container into production. The isolation between containers make these changes less disruptive than traditional software models.
Product perspective
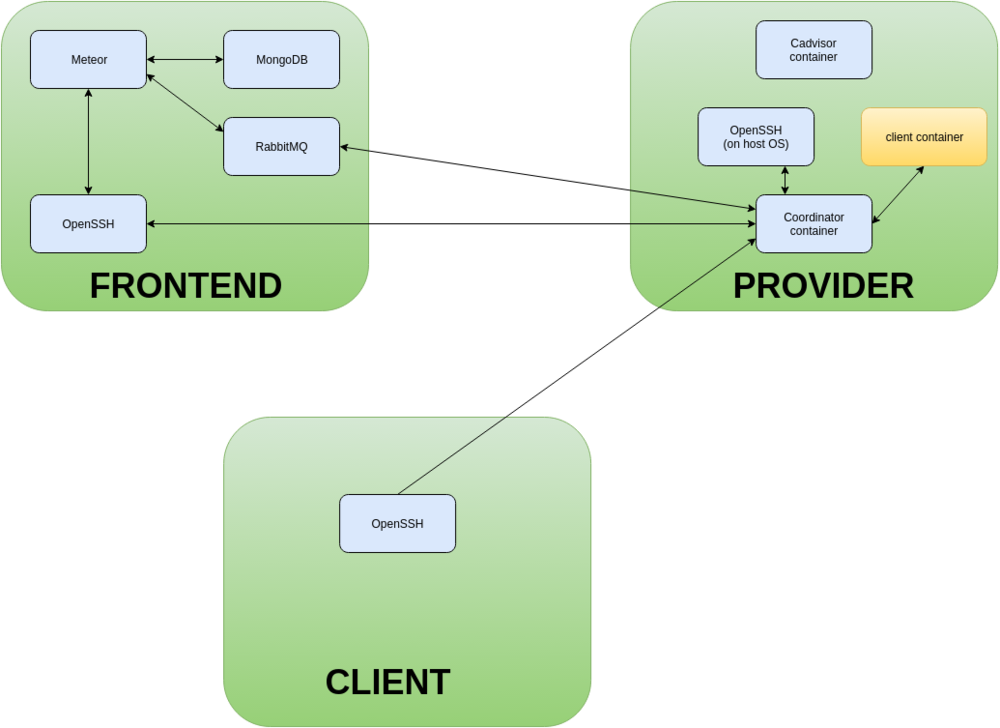
System Architecture
Global Architecture
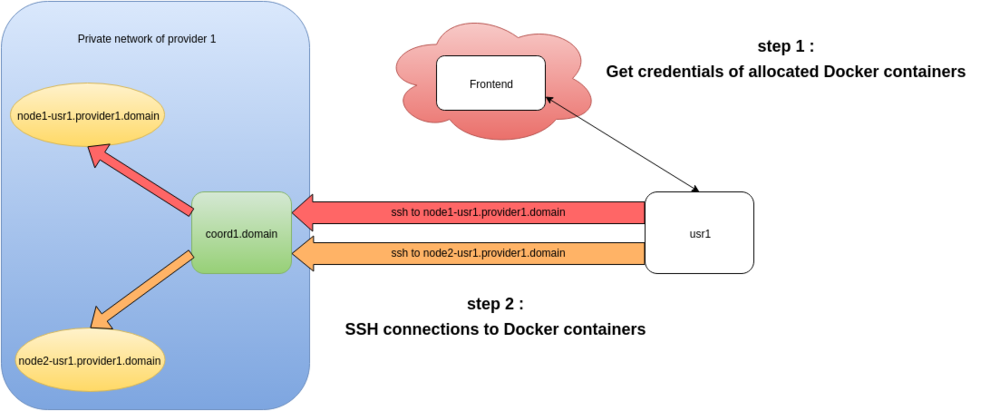
Instances allocation
SSH connections to allocated instances
Provider and Frontend details
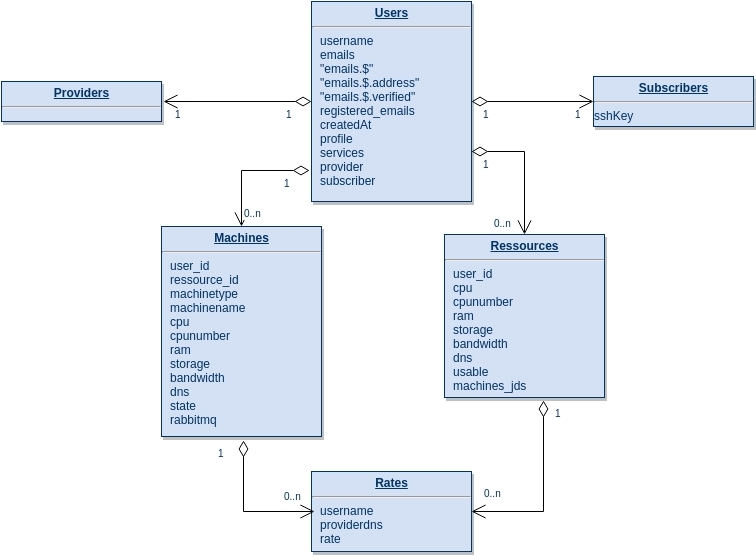
Database schema
Containers' automatic deployment
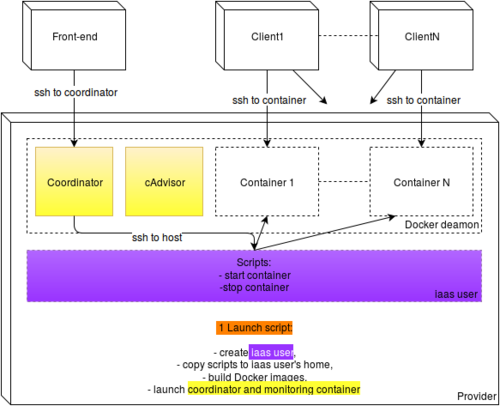
The aim of this part is to automatize the containers deployment on provider side. This includes launching coordinator instance and monitoring instance (shinken). The coordinator instance will allow us to launch new containers and establish the link between clients and their containers.
Build and run
First step: user creation
Since we can only interact with the coordinator instance from the front-end, we need a way to launch new container. It's not possible to do so from a container, and that task needs to be done from the host. That's why the first step is to create a new user on provider machine that we will use to launch new containers or stop them. The moment it is done, we deploy necessary scripts in this user's home. Those scripts are necessary to launch and stop new containers. It is simpler for us to do so than transferring those files from the coordinator to the host when the connection is established.
Second step: images creation
Then, the second step consists in building coordinator and monitoring (cAdvisor) images. To do so we use Dockerfile that allows us to build a container containing all we need. The coordinator instance just contains a ssh web-server. That container exposes its port 22000 and will be used as a jump host to connect the front-end/clients to the other instances.
Third step: coordinator and monitoring instance deployment
Finally, when the images are successfully built, we can run these containers on Docker deamon. We are now able to connect the front-end to the coordinator instance and deploy instances.
Resources management
Docker already provides some functionalities which allows us to restrict CPU and memory usage. However, we needed to implement some functionalities ourselves like space disk usage and bandwidth restriction.
CPU: To restrict CPU usage, we just need to know the hyper-threading coefficient and remember which CPU is already used. There is a Docker option we can use while launching container that allow us to choose which CPU the container will use to run. The example below shows how this works with 4 CPU (and hyper-threading coefficient is 2).
Memory: While launching a container, we set a memory soft limit as the value required/reserved by the client. The hard limit is set as the maximum memory made available by the provider In doing so, a container can use more memory that his soft limit. But if several containers are running on the same host, Docker will ensure that each container doesn't consume more memory than his soft limit.
Disk: Docker doesn't seem to provide a functionality to restrict disk usage. And yet, it's really important for us to make sure that a client will not use too much space disk of the provider. To do so, we implemented a watchdog that checks every 30 seconds the disk usage of each container and stops them if they reach the limit defined by the provider. We also use that watchdog to inspect and save container's information that will be used on the front-end to display container's state and space disk usage. Thanks to that, clients will know if they are about to reach the limit.
Bandwidth: Since all the containers run on the same Docker network, we are able to use Wondershaper and to set a limit for bandwidth usage. Then, Docker takes care to divide equitably the available bandwidth to each container.
Archive content
- Scripts:
- coordinatorBuild: used to build coordinator and shinken images
- coordinatorStart: used to start coordinator and shinken images
- coordinatorStop: used to stop coordinator and shinken images
- userAdd: add iaas user to host
- startProvider: main script that create iaas user, build all images, and start coordinator and monitoring containers
- Folders:
- containerManagment: contains all the scripts which are copied to iaas user home and will be used to manage containers
- coordinator: contains Dockerfile and script to initialize coordinator image
- docker_shinken: contains Dockerfiles and scripts to initialize monitoring image (note: we now use cAdvisor to monitor our containers)
- images: contains Dockerfiles and scripts to initialize main images (ubuntu, debian, centos)
How to use the scripts?
- To initialize and start coordinator and monitoring containers:
./startProvider.sh
- To start coordinator and monitoring containers (will have no effect if they are already started, not necessary if startProvider script is used):
./coordinatorStart.sh
- To stop coordinator and monitoring containers:
./coordinatorStop.sh
- If you need to update coordinator or shinken image:
- Update coordinator image
./coordinatorBuild.sh update coordinator
- Update shinken image (this is not necessary anymore since we use cAdvisor)
./coordinatorBuild.sh update shinken
- Update both coordinator and shinken image
./coordinatorBuild.sh update all
There is no need to use the other scripts the archive contains.
Monitoring with cAdvisor
We were looking for a light and efficient tool to monitor the instances running on provider side. We first used Shinken but we found this tool way to heavy for what we wanted to do. Then we found cAdvisor.
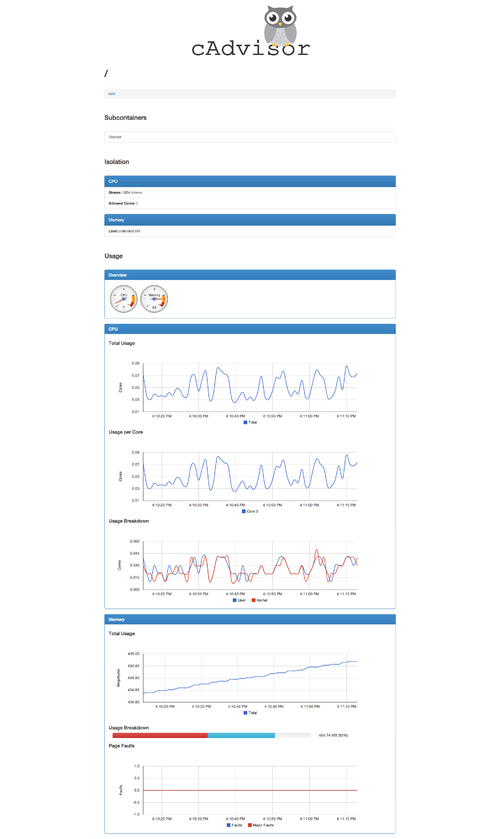
Google first created cAdvisor to monitor their own lmctfy containers and added Docker container support (those that use the default lib container execdriver). cAdvisor is short for Container Advisor. You can use cAdvisor to get a detailed look into the resource usage and the various performance characteristics of your running containers. cAdvisor includes a simple UI to view the live data, a simple API to retrieve the data programmatically, and the ability to store the data in an external InfluxDB.
If you want to monitor all of the containers you have running on a host, you can deploy the cAdvisor image as a container in that same host. It will then have access to the resource usage and performance characteristics of your other containers in that host.
You can check cAdvisor is running by pointing your browser to the host’s IP or hostname and port 8080. If running locally, try http://localhost:8080. This will bring up the built-in Web UI.
Useful links
- Docker official website
- Docker cycle
- Understand how Docker works
- Docker tutorial - Hello world (understand basic commands)
- Fix Docker's DNS issue with public network
- Angular Meteor official website
- MongoDB, the database used
- Collection2 - A Meteor package that allows you to attach a schema to a Mongo.Collection
- Asynchronous call in Meteor with fibers/future
- Notification module used to display pretty notifications
- meteorhacks:npm Installation Instructions
